Has anyone had any experience with sewing nylon webbing material together? The kind of thick industrial stuff you would find as straps on backpacks.
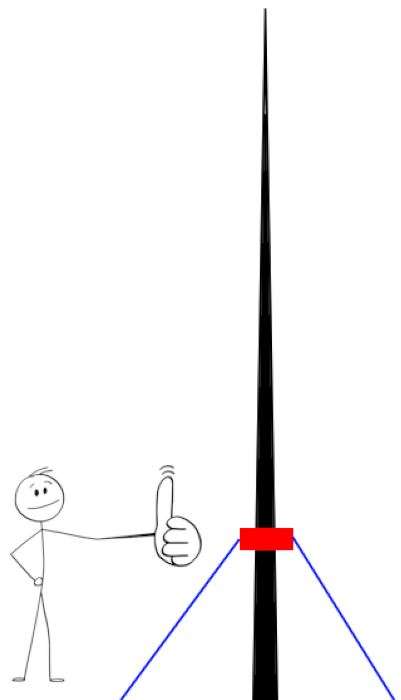
I have a small side project for putting up a portable antenna mast. These things exist for a similar product to mine: Spiderbeam GB 18m - Nevada Radio and are used to fasten guy lines to it, much like a tent, to stop it from falling down.
It’s stupid simple really - it’s 3 or 4 folded ‘prongs’ of webbing with a hole in the middle, which somewhat precisely fits over the mast so it sits at a particular height. Here’s a technical diagram I drew in my favourite CAD program:
I’d like to improve it, by:
Adding some metal/plastic D rings to the ends to make it easy to add/remove guy lines.
Make a few, sized for different positions on the mast I have.
Having 5 legs/prongs rather than 4 for different guying configurations (three-legged stool vs fancy dining chair)
Not having to pay £20 for a flappy bit of material that actually costs a few pence
Bonus points for somehow adding a label to identify where it’s supposed to go
Extra bonus points for turning it into a cottage industry so I can retire early.
I’ve tried sewing this strap material before with a sewing machine that was pretty clearly not up to the task of the thick material, with similarly rubbish results.
I found this YouTube video of someone using an old-school manual Singer to add a ‘box X’ stitch and makes it look embarassingly easy: https://www.youtube.com/watch?v=y03wcd_Z1G4
These routinely go for £20 on Facebook marketplace and I remember talking to @Heather_Gilligan once upon a time about getting one for the space.
If anyone is willing to deal with my complete inability to handle sewing projects for 30 minutes or so and help me out with trying to make some of these, I’d gladly donate a machine to the space for future use as well as my eternal gratitude.
Thanks Claire, I have not, but I do have a hand awl. I will try to give that a go, but my sewing skills leave much to be desired - so somehow thought a machine might be a better choice
If it’s anything like shoemaking you’d likely need a very big, heavy and expensive machine for something that heavy-duty. Even second-hand it could be quite pricey. I don’t own or use one.
I’ve successfully done some bag strap maintenance with leatherworking kit and will tend to bring such equipment to regular Makerspace evenings, if that helps?
thanks Claire!
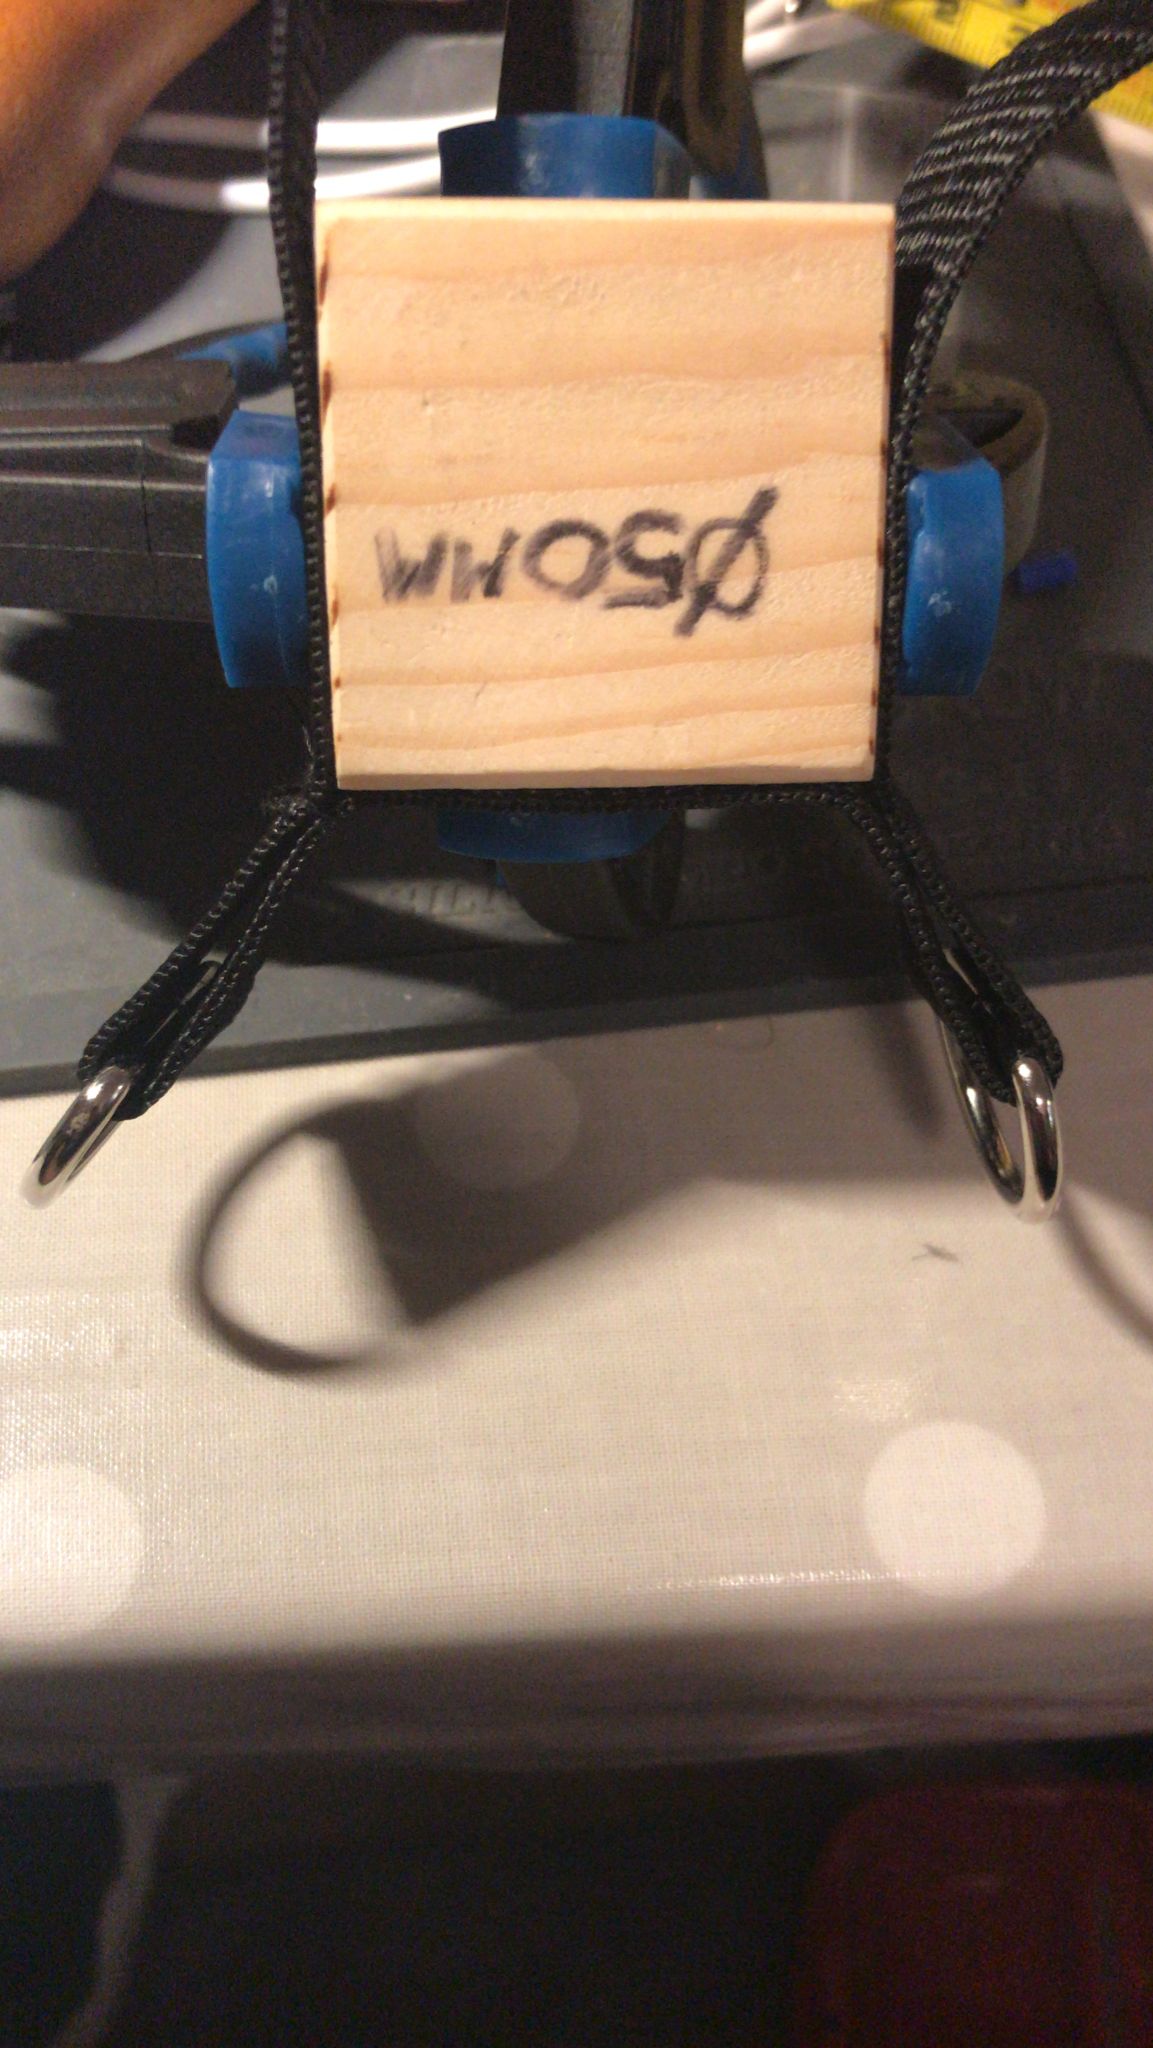
I had a go at using a speedy stitcher last night and made a fairly passable prototype.
I realised 5 prongs isn’t necessary, as if they are long enough you can use 3 guy lines by clipping two prongs together, or all 4 depending on the need.
I then spent too long thinking about how to make the inside the right diameter. I ended up making a block of wood with a perimeter the same as a circle with a diameter of where I want it to sit on the pole (that was a hard sentence to type).
Conveniently the first guy belt should sit a couple of metres off the ground which ended up being 50mm diameter exactly. Enter the square:
Having the corners of the square was nice as it helped with positioning the prongs easily. I am convinced this is how the commercial one is made. I did two prongs at a time, using some small f clamps to keep the material in place.
Things I learned:
The thread I used was probably too thin for the job but the joints are surprisingly tough regardless
There is a little bit of a stretch factor in the material/sewing that I wasn’t really expecting, so I should probably undersize the block by 1-3mm, however I do think it’s fine - it’s not a loose fit, but the guy belt moves below where I want it. Maybe it’s an impossible dream - each section of the pole is over a metre long and tapers, but only by a difference of 1mm from bottom to top. However, it will not slip over the joint to the next pole, so maybe this is where I should be positioning them.
I added the metal D rings and they are great and convenient so I will use those.
was going to add a straight stitch just behind the D ring to keep it in place a little, but I really don’t think it’s necessary with the box X stitch to fasten the two halves together.
This sort of webbing is used a lot in the sailing world. I know the sewing machines the sailmakers use are much stronger than domestic ones, so I tend not to sew mine. When I have made toestraps for my dinghy, I often bolt the webbing together using plastic toestrap plates (cheap) and M4 nuts/nyloc bolts. This can be simple to do and strong - I find that making a hole in the webbing is best done with a metal spike of some sort that is heated up (blowtorch or gas cooker) as this seals the bolt hole and stops it fraying.